RyanDiLorenzo-U04JGJN2B40

RyanDiLorenzo-U04JGJN2B40

0-day streak
I got the CH32V003F4U6 RISC-V microcontroller today and I wanted to program it with the USB protocol to make flashing a whole lot easier. To flash this microcontroller you need another microcontroller called the WCH-LinkE Mini. I plugged the WCH-LinkE flasher into my computer before installing custom drivers for it and got some cables to connect the flasher to the actual microcontroller. After this I tried to get the compiled binary file to flash after seeing they only have the C code, the instructions looked simple enough, just a simple "make build" command in the directory? I must have spent an hour and a half troubleshooting on why I was getting strange compilation errors and "SYNTAX ERROR IN LINE 502 OF FILE", it turns out that you have to copy another Github Repo's source code into a folder on the USB repo which contacts the C protocol file. Finally it compiled into a binary then I saw it wanted me to use the offical Wch-Link Programmer tool which I couldn't find a working website anywhere - the official website was down and there were no copies. I finally found and decided on using one built in Rust and after learning how to use the flash command, I kept getting the same generic "No microcontroller found". Another one and a half hours pass and on the readme file on the main repo, in small words it says to use the PD1 pin. Everywhere else I'd looked they said to connect to the SWIO pins or the UART pins and nowhere else said to use this specific PD1 pin only. At last, I finally got it to flash successfully, but upon connecting the USB-C cable right to the microcontroller, it wasn't showing up on Windows with the default pinouts. In the instructions though, it said to change the USB-C pin depending on what the microcontroller is connected to, seems simple right? Wrong, I purchased the microcontroller dev board off AliExpress and there was no mention anywhere of the pins or a pinout of where the USB-C data positive and negative lines are connected to. Not even any other github repos or anywhere had something that looked exactly as the PCB dev board I got. My next task is to reverse engineer the traces to figure out what exact GPIO pin the USB-C data lines are connected to, but this will prove to be tricky... Or maybe I can message the AliExpress seller but who knows when they'd reply. TLDR: It still doesn't work after all the issues I've had, the problem I'm facing now is the proprietary PCB I got from AliExpress which they won't post the schematic to.
https://scrapbook-into-the-redwoods.s3.amazonaws.com/d8d59c57-cac8-4622-8eee-231a0165f3d8-img_2127.jpg
pcb emoji
I wanted to use my Pine64 but kept running into a thermal runaway error because I didn’t have a powerful enough USB-C power supply; so I created my own using a 750W 12V HP Server PSU and a USB-C Trigger board. It will technically fry any USB-C device that doesn’t work on 12V so just don’t plug anything else into it…
https://scrapbook-into-the-redwoods.s3.amazonaws.com/b9bbc9f9-7d03-4244-945b-a355381c0348-img_2084.jpg
My cat's automatic litter box recently stopped working and it's around 300$ for a replacement which we were thinking of doing. I thought I could take a look at it and see if I could try to fix it. I initially thought the motherboard traces were corroded and not making contact so I tried to reflow the solder but no luck. The motherboard and microcontroller pre-installed had no documentation or help guides other than contacting the company to buy a replacement. I decided to try if I can use a Wemos D1 Mini ESP8266 microcontroller to control it, and after many hours (6) later I present to you a polarity switching circuit using 3 SPDT relays, a step-down buck converter to convert the 18V power from the built-in power on the cat litter to 12V the relays could use. Then after a lot of trial and error I found the perfect transistor (2N2222) in my transistor kit to convert the 3.3v logic levels from the ESP8266 to the 12v or something that the relays can use. Some of my trouble could be avoided if I used the correct DPDT relay modules meant for this, but this is all I had on hand. It's not quite finished since I still need to hook up the 2 sensors and 2 end stops to make it safe of course, but it's coming along and now the hard part is down. In the end, I'm going to open source a schematic design and order a PCB to contain everything.
https://scrapbook-into-the-redwoods.s3.amazonaws.com/c63630ae-8a1f-4ebd-887d-dbac2e06c161-img_1871.jpghttps://scrapbook-into-the-redwoods.s3.amazonaws.com/408057ff-4ea9-4133-aa42-73f6f7aa6b0e-img_1870.jpg
I had 2 IT people come from the school board to tell us how they hundreds of school networks across Ontario. They were nice and explained a lot, they were less in depth than I would have liked but that’s only because I know a lot already.
https://scrapbook-into-the-redwoods.s3.amazonaws.com/916b6dfc-43cd-45b5-83db-9344032ce9bd-img_1793.jpghttps://scrapbook-into-the-redwoods.s3.amazonaws.com/710cbd7d-c375-4f71-b517-da6264beecb0-img_1796.jpghttps://scrapbook-into-the-redwoods.s3.amazonaws.com/80e42d25-8e89-4b3d-9310-644b2604e7d9-img_1794.jpg
Finally had a chance and some money to replace my laptop's battery and thermal paste, it went from 46% wear level and in critical condition battery with a always thermal throttling CPU to a completely new battery with double the capacity and -25C with no thermal throttling.
https://scrapbook-into-the-redwoods.s3.amazonaws.com/60cbadf4-d9a5-4906-bf72-36763c4e501c-image.pnghttps://scrapbook-into-the-redwoods.s3.amazonaws.com/e75a38be-9d6d-476e-8ea2-9aa3fc690530-image.png
My LED light strip project is basically done, just in time for New Years Dinner! I used an open source program called WLED on a Wemos D1 Mini (ESP8266). I bought a 12V 50A PSU (overkill for 2 light strips) to power 2 WS2815 12V LED light strips (planning to add more). All I need to do is safety proof it by adding a fuse and wrapping everything in electrical tape, and it should be good.
https://scrapbook-into-the-redwoods.s3.amazonaws.com/ca77f6f6-f39a-4e5a-ad04-290b24f4b67a-img_0804.jpghttps://scrapbook-into-the-redwoods.s3.amazonaws.com/c10de418-032c-4886-90cb-a2d71a71bc92-img_0791.jpghttps://scrapbook-into-the-redwoods.s3.amazonaws.com/5d2f6e71-f5b3-485d-b07a-680be649134a-img_0805.jpg
wom emoji
yay emoji
Ardunio with a relay and boost converter to power many LEDs in series for a school computer engineering project.
I soldered RJ45 wiring to Arduinos cables for no specific reason and it works! Ignore the tablecloth burn by my heatgun.
https://scrapbook-into-the-redwoods.s3.amazonaws.com/a03bd31c-b748-4da6-8083-dbe49ce71300-img_0538.jpg
New sensor I setup to view the temperature inside my house, grafana.limeskey.com/inside. I had an issue with nginx because I have 2 sensors and didn't want to create a new subdomain. Instead I set it to send data to a path /device1 , which almost worked but nginx also forwarded that subdomain to Prometheus exporter translator which didn't like the path. After struggling, I was able to strip the path in my nginx config by doing this,
location /device1 {
    rewrite ^/device1(.*)$ $1 break;
    proxy_pass <http://192.168.1.100:9983>;
}
After some other smaller issues, it finally worked! My physical sensor supports TVOC, but the docker I'm using to make the data useful to Prometheus does not support TVOC. For a later date I might try to look deeper into this. hub.docker.com/r/timmy1e/airgradient-prometheus
https://scrapbook-into-the-redwoods.s3.amazonaws.com/74f38cf6-e5ef-46b1-a562-409195eefb9d-image.png
Just doing a random java project to gain experience working with math and for loops
https://scrapbook-into-the-redwoods.s3.amazonaws.com/31624555-29d1-42de-809c-39e2f2549a9f-image.png
java_duke emoji
I printed out my kernel logs to try to troubleshoot my kernel crash.
https://scrapbook-into-the-redwoods.s3.amazonaws.com/83116595-4be9-4e8d-9566-f36bc8b16f88-img_0282.jpg
After months of procrastination, I fixed the button issue on my website. It's only a small issue, but before the bubbles looked like they overlapped and it was very bad to view on mobile. I had 2 issues, my website would not deploy on Cloudflare pages because my node version was too old, I thought I had fixed this but it didn't work, turns out there was a small whitespace in my environment variable. Second issue with the buttons, I had just set a manual spacing option thing instead of having the flex box handle everything.
https://scrapbook-into-the-redwoods.s3.amazonaws.com/2132015e-0f29-4223-91ea-93ff9d0beedd-image.png
I setup a Arch VM on my NAS. Took 2+ days and lots of excruciating pain but I did it and now I get to brag.
https://scrapbook-into-the-redwoods.s3.amazonaws.com/50d6c3d9-7c57-46d6-b710-aa19c2bfd279-image.png
nice100 emoji
I have been trying to get better at Rust, so I created a small program to help me learn and practice coding. It's called PasswordLLM (bad name, don't ask) and it gives you various details about a password you enter into it. Look at the source code / run it here: github.com/VerisimilitudeX/PasswordLLM
https://scrapbook-into-the-redwoods.s3.amazonaws.com/8de681b6-d0e2-4f81-a997-2cacca1ce29a-image.png
I relocated my server into the Rosewill RSV-L4500U 4U Server Chassis, took approximately 3 hours and it was worth it.
https://scrapbook-into-the-redwoods.s3.amazonaws.com/a535c598-c3ae-4123-9b0c-436bbad5ec27-img_2102.jpghttps://scrapbook-into-the-redwoods.s3.amazonaws.com/88989e46-8020-4ba4-b98c-593476396f7d-img_2110.jpghttps://scrapbook-into-the-redwoods.s3.amazonaws.com/da3fa9e1-4628-44e0-a08d-d622b3786ffb-img_2107.jpghttps://scrapbook-into-the-redwoods.s3.amazonaws.com/71baff97-4b31-47b5-9856-8824117bc1cd-image.png
I am trying to setup my air quality sensor with Prometheus and Grafana but am having some trouble.. I will keep on troubleshooting!
https://cloud-89e481kdf-hack-club-bot.vercel.app/0image.pnghttps://cloud-5jm58mit2-hack-club-bot.vercel.app/0image.pnghttps://cloud-9il1l75gi-hack-club-bot.vercel.app/0image.png
wom emoji
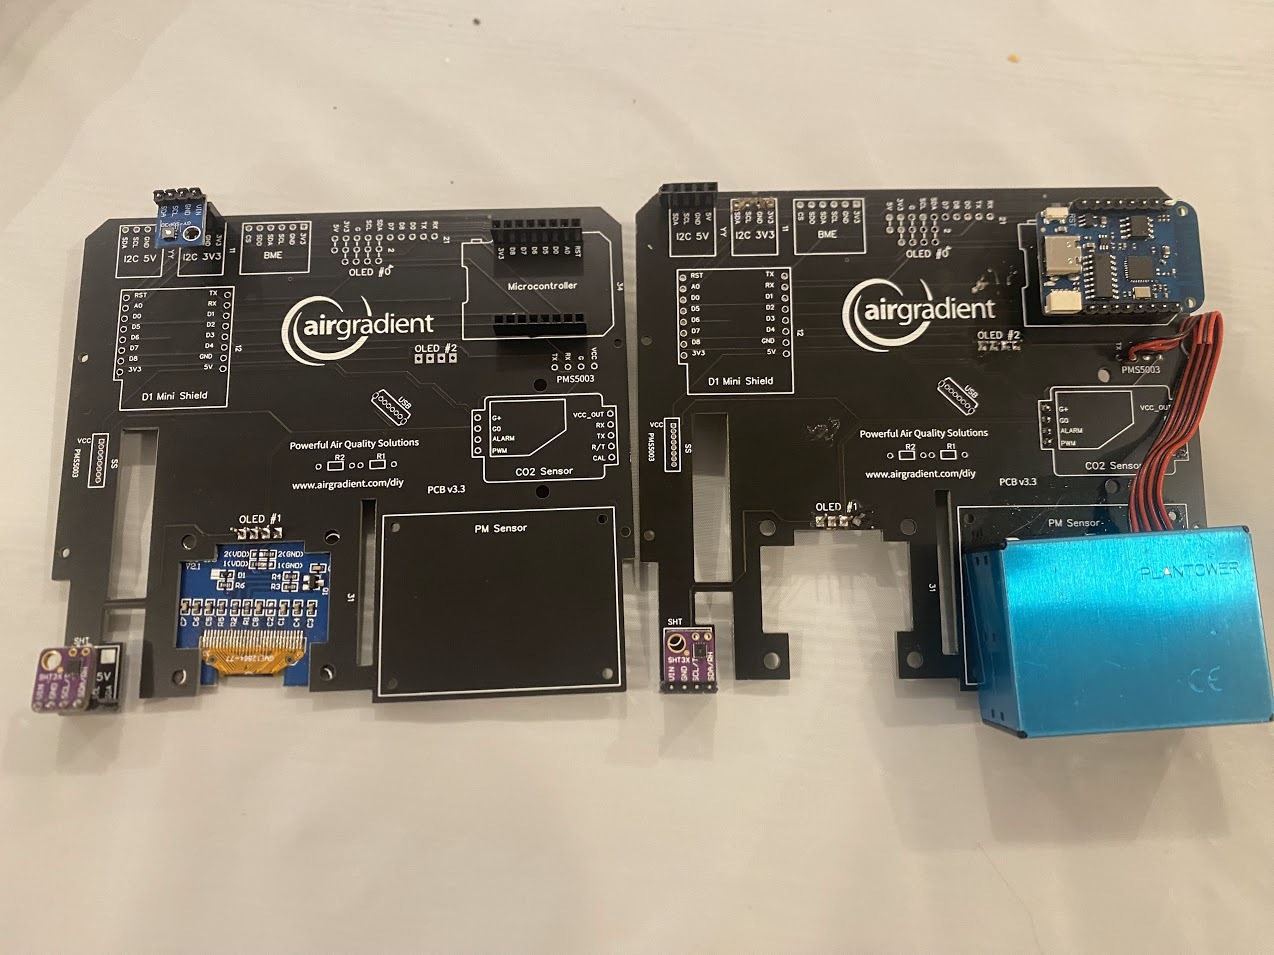
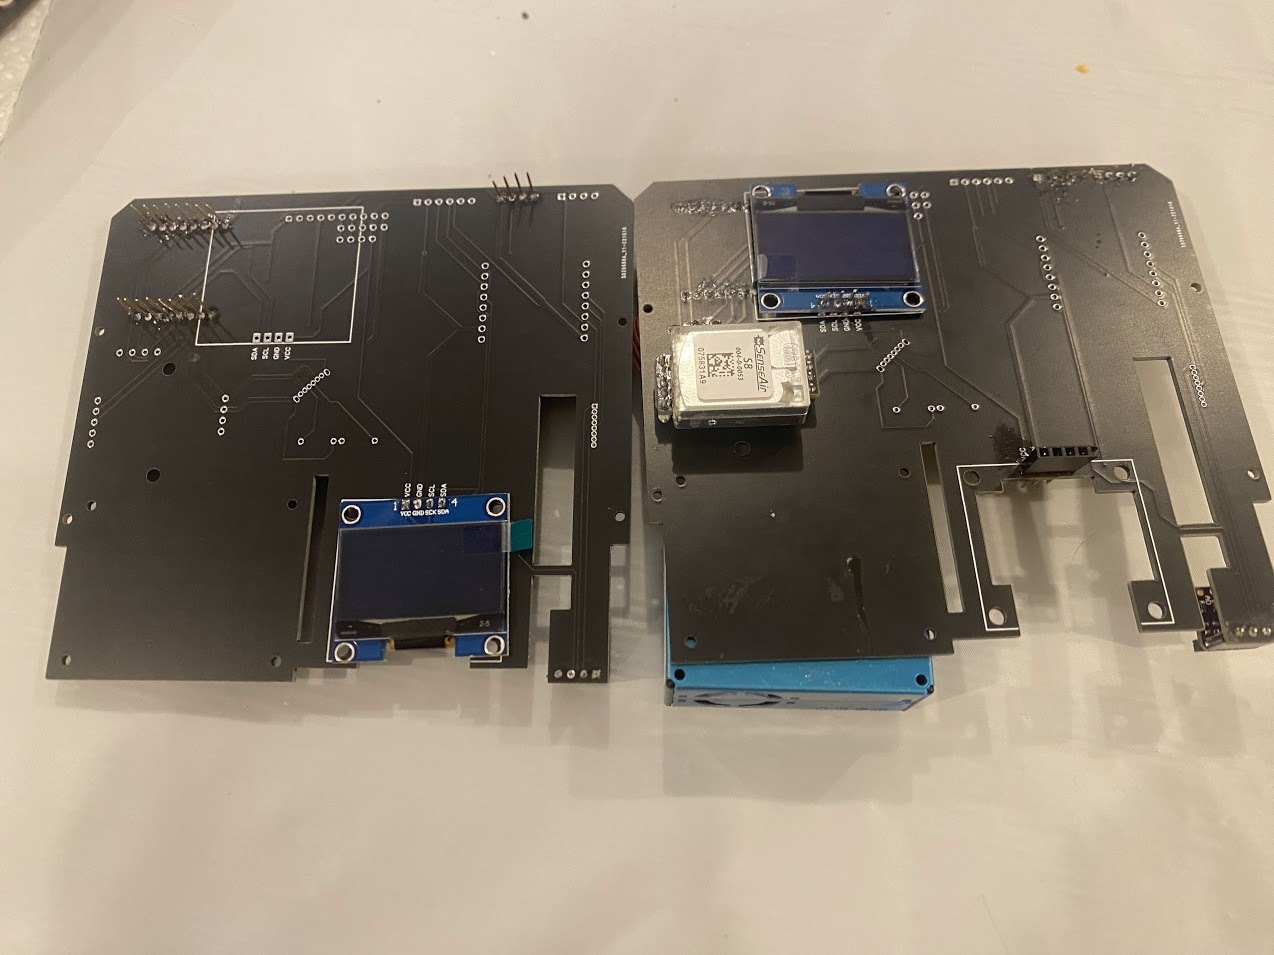
This is the air quality sensor i'm doing by AirGradient, I decided to make 2 since I had extra parts. I had some trouble at the beginning and messed up a lot of the solder so now I have to take some components out and replace/re-solder them. It's a big challenge de-soldering anything because those copper pads are so fragile and just fall off. I have some extra parts so I should be ok. My friend told me I'm also holding the soldering iron on the solder too long causing some burns which I see. They both do work (have to flash a new microcontroller though) and most of the sensors show up which is great.
https://cloud-d95xz78om-hack-club-bot.vercel.app/0img_0714.jpghttps://cloud-8rcvzobi0-hack-club-bot.vercel.app/0img_0713.jpg
wom emoji
winter-hardware-wonderland emoji
I just installed and deployed a new 1TB Crucial P3 NVME SSD to hopefully fix my CPU IO Wait issue caused by a torrent docker container I have. It's been slowing down my whole system and I've been struggling with this problem for a long time now. So far looks so good and the issue seems to be gone. Let me know if you have any tips on how to better log processes with IO Wait, currently I've using some type of plugin called "IOTop" and I'm using Prometheus with Grafana to display the data.
https://cloud-5qzudfl5y-hack-club-bot.vercel.app/0image.png
docker emoji
wom emoji
winter-hardware-wonderland emoji
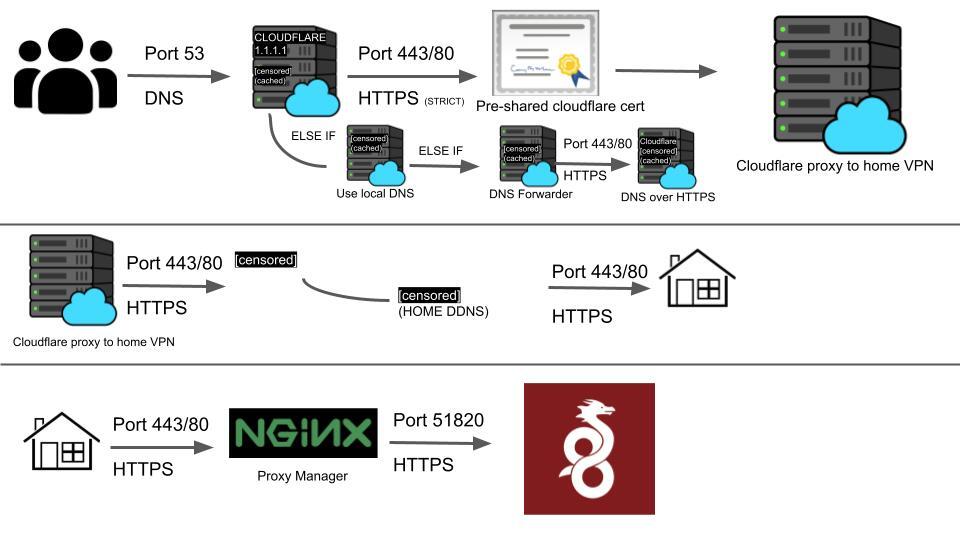
I am trying to make a almost-impossible to block Wireguard or OpenVPN server, here's a diagram of my solution of ways they can possibly block it. Let me know if you have more suggestions
https://cloud-p2xflsy2r-hack-club-bot.vercel.app/0vpn_config_pub_.jpg
wom emoji
https://cloud-6eietuth8-hack-club-bot.vercel.app/0image.png
wom emoji
https://cloud-4rwmgcicl-hack-club-bot.vercel.app/0image.png